Search Platform using Elasticsearch (on AWS)

Apache Lucene is a high performance, cross-platform search engine library, which has gained immense support in enterprises looking to build firm-wide, customer-facing search platforms. And it does owe good share of its popularity to Apache Solr and Elasticsearch, that are matured search products built on top of Lucene. We chose Elasticsearch 2.3.3 (5.0 is the current version at time of writing), to build our multi-entity search platform for a financial services firm.

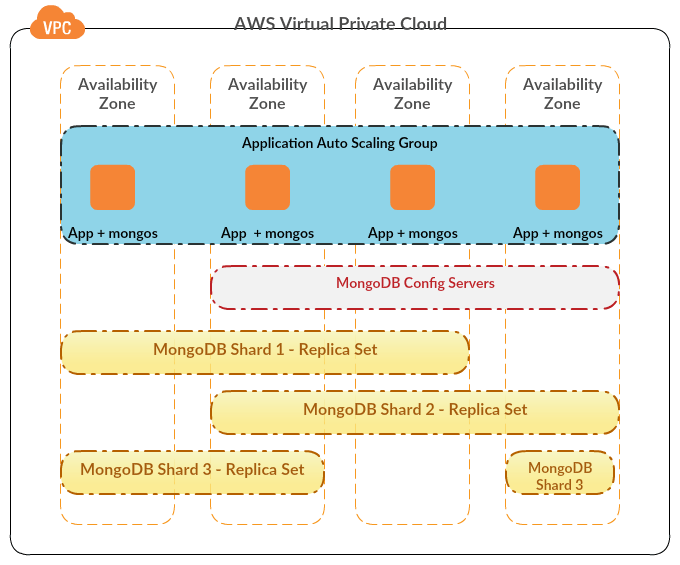
All our applications and data platforms are housed in AWS VPCs. We decided to implement our own cluster on EC2 rather than using AWS Elasticsearch, with main reasons being: AWS Elasticsearch doesn’t provide data encryption using AWS KMS yet (at least at time of writing this);  AWS has been generally behind on adding latest Elasticsearch versions; and we wanted full freedom in maintaining our own cluster with choice of security groups, plugins, monitoring etc. Without going into details of infrastructure, I’ll just mention the major plugins we are using:

  • EC2-Discovery for unicast discovery (AWS doesn’t support multicast out of box)
  • Kopf for web-based administration
  • Head for web-based administration
  • SQL for data analysis
  • Read-only to control maintenance actions (alternative to using Nginx as proxy)

elasticsearch-cluster

Our indexing and query services have been implemented in Java (using Spring Boot), and we use Elasticsearch’s Java API (Transport Client) to connect to the cluster. We don’t use Spring Data Elasticsearch, as it also lags behind in version upgrades mostly. Now, moving to what we want to focus on in this blog: how to implement a search service for data stored in Elasticsearch.

First and most important component that impacts data indexing and search in Elasticsearch is an Analyzer. Analysis is the process of converting text, like a product description, or a person name into tokens or terms which are added to the inverted index for searching. Analysis is performed by the analyzer which can be either a built-in or custom. There’re three sub-parts to an analyzer, and they process all incoming text in this order:

  • Character Filter – Used to preprocess text before indexing/searching, like stripping HTML markup
  • Tokenizer – Main component which produces tokens from incoming text
  • Token Filter – Can modify, delete or add tokens to stream of tokens from tokenizer

For our product and person search services (90% of our search functionality), we created custom edgeNGram based token filters, and analyzers using those token filters. A edgeNGram token filter is similar to a nGram token filter, except that it only keeps nGrams which start at the beginning of tokens produced by a tokenizer. The analysis settings for such an index look like:

{
  "settings": {
    "index": {
      ...
    },
    "analysis": {
      "filter": {
        "autocomplete_filter": {
	  "type": "edgeNGram",
	  "min_gram": "1",
	  "max_gram": "10"
	},
	"autocomplete_phrase_filter": {
	  "type": "edgeNGram",
	  "min_gram": "1",
	  "max_gram": "20"
	}
      },
      "analyzer": {
	"keyword_analyzer": {
	  "type": "custom",
	  "filter": [
	    "asciifolding","lowercase"
	  ],
	  "tokenizer": "keyword"
	},
	"autocomplete_analyzer": {
	  "type": "custom",
	  "filter": [
	    "standard","lowercase","stop","autocomplete_filter"
	  ],
	  "tokenizer": "standard"
	},
	"autocomplete_phrase_analyzer": {
	  "filter": [
	    "standard","lowercase","autocomplete_phrase_filter"
	  ],
	  "type": "custom",
	  "tokenizer": "keyword"
        }
      }
    }
  }
}

Now we apply these analyzers to field mappings in the index. In a elaborate search platform, where one needs ability to search a field in different ways, it’s fruitful to store multiple versions of such a field, often using different analyzers during indexing and searching. That way, one could use more relevant version for a given scenario. For e.g.:

{
  "settings": {
    "index": {
      ...
    },
    "analysis": {
     ...
    }
  },
  "mappings": {
    "product": {
      "dynamic": "strict",
      "_all": {
	"enabled": false
      },
      "properties": {
        ...
        ...
	"productTypeCode": {
	  "type": "string",
	  "norms": {
	    "enabled": false
	  },
	  "analyzer": "keyword_analyzer"
	},
        "productName": {
	  "type": "string",
	  "term_vector": "with_positions_offsets",
	  "analyzer": "english",
	  "fields": {
	    "autocomplete_exact": {
	      "type": "string",
	      "norms": {
		"enabled": false
	      },
	      "analyzer": "keyword_analyzer"
	    },
	    "autocomplete_phrase": {
	      "type": "string",
	      "norms": {
		"enabled": false
	      },
	      "analyzer": "autocomplete_phrase_analyzer",
	      "search_analyzer": "keyword_analyzer"
	    },
	    "autocomplete_startswith": {
	      "type": "string",
	      "norms": {
	        "enabled": false
	      },
	      "analyzer": "autocomplete_analyzer",
	      "search_analyzer": "standard"
	    },
	    "autocomplete_token": {
	      "type": "string",
	      "norms": {
		"enabled": false
	      },
	      "index_options": "docs",
	      "analyzer": "standard"
	    },
	    "raw": {
	      "type": "string",
	      "index": "not_analyzed"
	    }
	  }
	}
        ...
        ...
      }
    }
  }
}

What’s worth noting above is how custom analyzers have been used along with built-in analyzers to map different versions of productName (and other fields like that). This is how different versions could be used during searching:

  • productName.autocomplete_exact – to match stored documents that are exactly equal to full queried text (case-insensitive) – Query against “intel corp” will match “Intel Corp“, and not “Intel Corporation“.
  • productName.autocomplete_phrase – to match stored documents that start with full queried text (case-insensitive) – Query against “intel corp” will match both “Intel Corp” and “Intel Corporation“.
  • productName.autocomplete_token – to match stored documents that have exact tokens as full exact tokens in queried text (case insensitive) – Query against “intel corp” will match not just “intel” products, but also “Microsoft Corp” or any other product with “corp“, but won’t match “Microsoft Corporation” or like.
  • productName.autocomplete_startswith – to match stored documents that have tokens that start with tokens in queried text  (case insensitive) – Query against “intel corp” will match not just “intel” products, but also “Microsoft Corp“, “Microsoft Corporation“, “Intellisat” etc.

We use combinations of multiple fields in Elasticsearch queries to order search results (most relevant to least relevant). Elasticsearch Bool Query can be used to construct such compound/combinational queries, with different boost values set for sub-queries to get desired result order (default ordering by descending order of _score).

GET product/_search?search_type=dfs_query_then_fetch
{
  "query": {
    "bool": {
      "should": [
        {
          "constant_score": {
            "query": {
              "match": {
                "productName.autocomplete_exact": "intel corp"
              }
            },
            "boost": 300
          }
        },
        {
          "constant_score": {
            "query": {
              "match": {
                "productName.autocomplete_phrase": "intel corp"
              }
            },
            "boost": 200
          }
        },
        {
          "more_like_this": {
            "fields": ["productName.autocomplete_token"],
            "like": "intel corp",
            "min_term_freq": 1,
            "min_doc_freq": 1,
            "max_query_terms": 10,
            "minimum_should_match": 1,
            "boost": 100
          }
        },
        {
          "constant_score": {
            "query": {
              "match": {
                "productName.autocomplete_startswith": "intel corp"
              }
            },
            "boost": 10
          }
        }
      ],
      "minimum_should_match": 1
    }
  }
}

The above Bool query is composed of Constant Score and More Like This type of queries, which work for us. One should look to replace these sub-queries with appropriate query types, depending on desired search results.

Sometimes, the requirement is to search text in more than one field, with each field stored as multi-fields. For e.g. in our case, user wanted to search in both productName and productDesc fields. In such cases, one could use Dis Max compound query to produce a union of Bool sub-queries (one Bool sub-query per multi-fields field).

GET product/_search?search_type=dfs_query_then_fetch
{
  "query": {
    "dis_max": {
      "queries": [
        {
          "bool": {
            "should": [
              {
                "constant_score": {
                  "query": {
                    "match": {
                      "productName.autocomplete_exact": "intel corp"
                    }
                  },
                  "boost": 300
                }
              },
              {
                "constant_score": {
                  "query": {
                    "match": {
                      "productName.autocomplete_phrase": "intel corp"
                    }
                  },
                  "boost": 200
                }
              },
              {
                "more_like_this": {
                  "fields": ["productName.autocomplete_token"],
                  "like": "intel corp",
                  "min_term_freq": 1,
                  "min_doc_freq": 1,
                  "max_query_terms": 10,
                  "minimum_should_match": 1,
                  "boost": 100
                }
              },
              {
                "constant_score": {
                  "query": {
                    "match": {
                      "productName.autocomplete_startswith": "intel corp"
                    }
                  },
                  "boost": 10
                }
              }
            ],
            "minimum_should_match": 1
          }
        },
        {
          "bool": {
            "should": [
              {
                "constant_score": {
                  "query": {
                    "match": {
                      "productDesc.autocomplete_exact": "intel corp"
                    }
                  },
                  "boost": 300
                }
              },
              {
                "constant_score": {
                  "query": {
                    "match": {
                      "productDesc.autocomplete_phrase": "intel corp"
                    }
                  },
                  "boost": 200
                }
              },
              {
                "more_like_this": {
                  "fields": ["productDesc.autocomplete_token"],
                  "like": "intel corp",
                  "min_term_freq": 1,
                  "min_doc_freq": 1,
                  "max_query_terms": 10,
                  "minimum_should_match": 1,
                  "boost": 100
                }
              },
              {
                "constant_score": {
                  "query": {
                    "match": {
                      "productDesc.autocomplete_startswith": "intel corp"
                    }
                  },
                  "boost": 10
                }
              }
            ],
            "minimum_should_match": 1
          }
        }      
      ]
    }
  }
}

Dis max query generates the union of documents produced by its subqueries, and that scores each document with the maximum score for that document as produced by any subquery, plus a tie breaking increment for any additional matching subqueries.

Here we have discussed just the basic search elements. Elasticsearch provides many other constructs, using which one could filter, rescore (second level of scoring after first search), sort (sort on fields other than on _score) documents, or even use scripting to customize most of these operations. All of these features are quite intuitive to use with Elasticsearch, as we’ve experienced building out our search platform.

Hope you found this article a bit useful. All feedback is welcome.

Performance Best Practices for MongoDB

MongoDB is a document-oriented NoSQL database, used as data backbone or a polyglot member for many enterprise and internet-targeted systems. It has an extensive querying capability (one of the most thorough in NoSQL realm), and integration is provided by most of popular application development frameworks. There are challenges in terms of flexible scaling, but it’s a great product to work with once you come to terms with some of the nuances (you need patience though).

We’re using MongoDB as an event store in a AWS deployed financial data management application. The application has been optimized for write operations, as we have to maintain structures from data feeds almost throughout the day. There are downstream data consumers, but given defined query patterns, read performance is well within the defined SLA. In this blog, I’ll share some of the key aspects that could help improve write performance of a MongoDB cluster. All of these might not make sense for everyone, but a combination of a few could definitely help. MongoDB version we’re working with is 3.0.

  • Sharding – Sharding is a way to scale-out your data layer. Many in-memory and NoSQL data products support sharded clusters on commodity hardware, and MongoDB is one of those. A shard is a single MongoDB instance or a replica-set, that holds a subset of total data in the cluster. Data is divided on basis of a defined shard key, which is used for routing requests to different shards (by mongos router). A production-grade sharded cluster takes some time to setup and tune to what’s desired, but yields good performance benefits once done right. Since data is stored in parts (shards), multiple parts can be simultaneously written to without much contention. Read operations also get a kick if queries contain the shard key (otherwise those can be slower than non-sharded clusters). Thus, choosing the right shard key becomes the most important decision.

MongoDB App Cluster

  • Storage Engine – Storage engine determines how data will be stored in memory and on disk. There are two main storage engines in MongoDB – WiredTiger and MMAPv1. MMAPv1 was default until version 3.0, and WiredTiger is default in 3.2. Biggest difference between the two is that MMAPv1 has at best collection-level locking for writes, whereas WiredTiger has document level locking (mostly optimistic). Thus, WiredTiger can allow for a more fine-grained concurrency control, and more parallel writes possibly. WiredTiger also comes with data compression on disk, plus has a checkpointing feature to maintain consistency (in addition to default Journaling). If you’re using version 3.0, MMAPv1 could still be good enough given that it’s a tried and tested component and WiredTiger was still fairly new at that point.
  • Write Concern – Write concern allows one to define the degree of acknowledgement indicating success of a write operation. If a system can easily recover write losses without observable impact to users, then it’s possible to do away with acknowledgements altogether, so as to make the write round-trip as fast as possible (Not allowed if Journaling is ON). By default, acknowledgement is required from a standalone instance or primary of a replica set. If one wants strong consistency from a replica set, write concern can be configured to be more than 1 or “majority” to make sure writes have propagated to some replica nodes as well (though it’s done at cost of degraded write performance).
  • Journaling – Journaling is basically write-ahead logging on disk to provide consistency and durability. Any chosen storage engine by default writes more often to the journal than to the data disk.  One can also configure Write Concern with “j” option, which indicates that operation will be acknowledged after it’s written to the journal. That allows for more consistency, but overall performance can take a hit (duration between Journal commits is decreased automatically to compensate though). From a performance perspective, there’re a couple of things one can do with respect to Journaling – 1. Keep journal on a different volume than the data volume to reduce I/O contention, and/or 2. Reduce interval between journal commits (please test this thoroughly, as too less a value can eventually decrease overall write capacity).
  • Bulk Writes – One can write multiple documents in a collection through a single bulk-write operation. Combined with WiredTiger storage engine, this can be a great way to make overall writes faster if it’s possible to chunk multiple writes together. Though if you’ve a e-commerce system, and you need to handle write operations per user transaction, it might not be a great option. Bulk writes can be ordered (serial and fail-fast) or unordered (parallel isolated writes), and the choice depends on specific requirements of a system.

There’re other general and non-intrusive ways to improve overall performance of a MongoDB cluster, like increase memory (to reduce read page faults), use SSD for data volume, or increase disk IOPS (should be employed if cost and infra limits permit). What we’ve covered above are specific MongoDB provided features, which can be played around with, provided there’s appetite.

Hope this was a wee bit helpful.

Data analysis with Spark Streaming

Data analysis with Spark Streaming

Apache Spark has more than taken off by now. It’s being used to solve myriad types of data analysis problems, whether it’s a recommendation system for a modern retail store, or a business intelligence platform for a conservative financial asset manager, and many. Apart from its features and performance to reckon with, a big part of Spark’s success was its support for Python, which led to its widespread adoption. And now they’ve added a R package SparkR, which has been a attention grabber for all those R enamored data scientists out there. No doubt it has taken a fair share of limelight from Hadoop Mapreduce.

Apart from the core Spark engine, there’re four add-on modules that make this framework a powerhouse to reckon with:

  • Spark Streaming – to process real-time data streams
  • Spark SQL and Dataframes – to support relational data analysis, and data structures common to R and Python Pandas.
  • Spark MLib – to create machine learning applications
  • Spark GraphX – to solve graph functional problems, like in hierarchies, networks etc.

In this post, we’ll look at a simple data problem, which needs some computation over a continuous stream of US consumer complaints data (Source: Data.gov). We’ll be using Spark Streaming  (Java API) with Apache Flume (a data collector and aggregator) to exemplify real-time data analysis. Flume will be used as a generator of real-time data events (for sake of simplicity, we’re using a finite dataset). Whereas a standalone Spark Streaming program will consume events as they are generated, maintain a rolling count of consumer complaints by type and US state, and store results to a file at a frequency.

Spark_Streaming_with_Flume
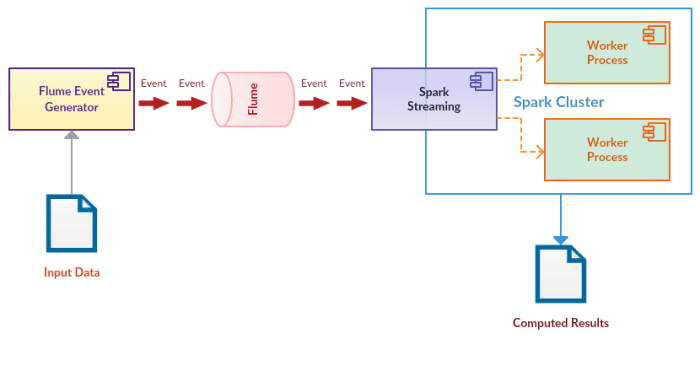
It’s a hypothetical problem, hence you’ll see events being generated from a finite dataset (CSV file of consumer complaint records – many columns removed to keep it simple). Our sample data looks like this:

"Debt collection","Credit card","MA"
"Bank account or service","Checking account","TN"
"Consumer loan","Vehicle loan","FL"
"Bank account or service","Savings account","PA"
"Debt collection","","GA"
"Debt collection","Credit card","FL"
"Debt collection","Medical","DE"
"Credit reporting","","TX"
"Mortgage","Other mortgage","CA"

First we see a basic Flume event generator (with Avro source). It needs a running Flume agent (directions mentioned below). Full source for event generator is available at Flume Client.

// Initialize connection to Flume agent, and the event source file
public void init(String hostname, int port) {
	// Setup the RPC connection
	this.hostname = hostname;
	this.port = port;
	this.client = RpcClientFactory.getDefaultInstance(hostname, port);

	try {
		InputStream inStream = this.getClass().getClassLoader()
				.getResourceAsStream("cons_comp_data.csv");
		Reader in = new InputStreamReader(inStream);
		csvRecords = CSVFormat.DEFAULT.
                             withSkipHeaderRecord(true).parse(in);
	} 
        .......
        .......
}

// Send records from source file as events to flume agent
public void sendDataToFlume() {
	CSVRecord csvRecord = null;
	Iterator csvRecordItr = csvRecords.iterator();
	while (csvRecordItr.hasNext()) {
		try {
			csvRecord = csvRecordItr.next();
			String eventStr = csvRecord.toString();
			System.out.println(eventStr);
			Event event = EventBuilder.withBody(eventStr,
					Charset.forName("UTF-8"));
			client.append(event);
		} 
                .......
                .......
	}
}

Now we take a look at the Spark Streaming program, which processes each event to maintain a rolling count by complaint type and state. At the start, we create a JavaStreamingContext, which is the entry point to a Spark Streaming program, and create a input stream of events using Spark-Flume integration.

SparkConf sparkConf = new SparkConf().setAppName("ConsCompEventStream");

// Create the context and set the checkpoint directory
JavaStreamingContext context = new JavaStreamingContext(sparkConf,
				new Duration(2000));
context.checkpoint(checkpointDir);

// Create the input stream from flume sink
JavaReceiverInputDStream flumeStream = FlumeUtils.createStream(context, h  ost, port);

We are setting a checkpoint folder in JavaStreamingContext, which is used to create Fault tolerant Spark Streaming applications. It allows the application to recover from failures. Please read more at Spark Checkpointing.

Rest of the program processes each Flume event in logical steps:

  • Use map() function to convert incoming stream of events to a JavaDStream. This allows us to convert each Flume event into a processable format.
  • Use mapToPair() function to convert each processable event to a JavaPairDStream of complaint type and US state.
  • Use updateStateByKey() function to maintain a rolling count by complaint type and US state.
  • Use foreachRDD() function to store the rolling count to a file periodically.
// Transform each flume avro event to a processable format
JavaDStream transformedEvents = flumeStream
		.map(new Function<SparkFlumeEvent, String>() {
                  .........
                };

// Map key-value pairs by product and state to count of 1
JavaPairDStream<Tuple2<String, String>, Integer> countOnes = transformedE  vents
		.mapToPair(new PairFunction<String, Tuple2<String, String>,   Integer>() {
                  .........
                };

// Maintain a updated list of counts per product and state
JavaPairDStream<Tuple2<String, String>, List> updatedCounts = countOnes
		.updateStateByKey(new Function2<List, Optional<List>, Optio  nal<List>>() {
                  .........
                };

// Store the updated list of counts in a text file per product and state
updatedCounts.foreachRDD(new Function<JavaPairRDD<Tuple2<String, String>,   List>, Void>() {
                  .........
                };

Full source is available at Spark Flume Stream. It also includes complete information on how to configure and run the Flume agent, as well as how to run this program using a local Spark cluster. The implementation is in Java 1.7, hence the use of anonymous inner classes. It can look a lot concise and prettier if converted to use lambdas with Java 8. I won’t mind a merge request for the same ;-).